Improve Your Astrophotography With This One Trick
Successful astrophotography comes down to one simple principle - collecting enough light! Whether you're pro or total newb, the ultimate goal is to collect enough light i.e. data to produce a compelling image. When first starting out you'll learn the technical nuances of shooting the night sky such as widening the aperture, raising ISO, and lengthening exposure times to maximize the light gathered. If this doesn't make sense be sure to checkout this excellent article over on ImprovePhotography.com.
Many also consider purchasing specialty lenses for astrophotography or even upgrading their camera bodies, however, this route can get quickly get very expensive. Other options include learning more advanced post-processing methods such as image stacking or exposure blending to further their progress, but this can significantly lengthen the amount of time spent behind a computer image processing.
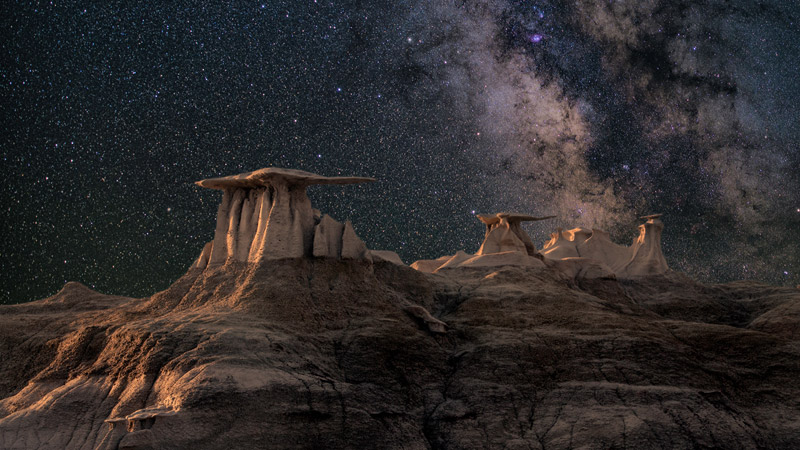
The best way to improve your astrophography without added cost or time is to add an external light source! To be clear, I am not recommending traditional forms of light painting that include waving around a flashlight or headlamp. My recommended approach leverages a more consistent form of light painting known as Low Level Lighting (LLL). This involves the use of one or more small strategically placed small LED panels to softly light your foreground in a natural way. These dim fixed light sources ensure a consistently lit and intriguing foreground in a single shot such as the one seen at the top of this post.
Why Is This Necessary?
As you've probably learned from shooting towards the sun during the day, the sky is much brighter than the ground. In fact, it has such a large dynamic range that it's not possible to capture everything in a single image. This also holds true at night. Like bracketing during the day, the only way to capture everything is to take multiple images and later blend them together.
Many use the rule of four in night photography to first capture a properly exposed image for the sky, then lower their ISO and increase the exposure time to four times (4x) that of the sky. Once both shots have been acquired they can be later blended into a single balanced image. While this approach works, it has its own limitations:
- Multiple exposures require additional time spent in post-processing to produce a single properly exposed image.
- Relying solely on starlight for ground illumination results in a very flat image that lacks interest and fails to highlight foreground features.
- Conditions are not always conducive to ultra-long foreground exposures as the chance for interference from wind or other people greatly increases. If you've ever had a car ruin your shot by driving by halfway through a four minute exposure you know exactly what I'm talking about!
Downsides To Traditional Light Painting
Handheld lights such as headlamps and flashlights are a much more intense source of light than you realize. Holding them in one spot too long will quickly lead to a white hot overexposed sections rendering the shot useless. To avoid this, one has to quickly move the light across the scene in sweeping motions to "paint" in the light evenly. This inevitably takes at least a few takes to get something close to realistic looking, and prevents you from being able to direct your full attention on the shooting process itself. If you're shooting around anyone else then you should also be respectful to not ruin their shots with your light painting.
Lastly, I'll also note that controlling depth of the light is very tricky. As you can see in the image below, the person is brightly lit by the nearby intense light, but the light fails to illuminate anything behind them. While silhouettes can be interesting, they tend to lack the interest and variety of a well lit image.

Low Level Lighting Setup
As mentioned earlier the key to low level lighting is the use of LED light panels. These lights are mounted a distance away from your shooting position, and left on through the duration of shooting to provide constant illumination. The lights are typically staged at a 45-60 degree angle from the camera, and placed 100 feet (30m) away from the focal point of the foreground. This distant angled placement of the light ensures a smooth drop off for even illumination, while also exaggerating shadows and enhance perceived depth.
The primary light should be placed to the side of your composition that includes more of the milky way to create a more natural appearance. Even non-photographers will recognize an image as unnatural looking if the light sources don't match sides. You can add additional lights to balance the foreground, either to the alternating side, or backlit for additional interest. Note that these added lights should be set to a lower intensity than that of the primary light to maintain a natural appearance.
Dimmable lights are also extremely useful as you can dial the intensity up or down based on your initial test shots to obtain a natural look without needing to move the light. In the event you foreground is too strongly lit, simply move the light further away foreground's focal point until the correct intensity is obtained. Elevating the positioning of the lights will also help maintain its natural appearance. This can be done using tripods, light stands, or even placing the lights on nearby raised objects such as a rock or tree. You will be amazed at how little light it takes to really bring some life into your photos!
It should also be noted that most LED light panels have a very cool temperature color, however, this can be mitigated with gels or warming filters that slide over the light and warm up the source. This is beneficial in many scenarios as we tend to associate the ground with wamer tones and the sky with cooler tones. My personal favorite light panel is the Neewer CN-Lux360, you can find it here on Amazon. It's compact, portable, comes with a warming filter, and is even dimmable! For larger landscapes, or those where you will be physically far removed, you should also consider the Neewer CN-160 as a good option. It also comes with a warming filter and features dimmable controls, and can be found here on Amazon. Each of these options are $30 or less, and far cheaper method for greatly enhancing your astrophotography compared to buying new lenses or bodies!
- Zach